Clear, consistent photos are essential for modern coin collecting. Whether you want better images for grading, selling at auction, or simply documenting your numismatic collection, you do not need expensive studio equipment. With a few affordable tools and the right technique, you can build a simple coin photo studio that produces sharp, accurate images at home.
This guide is written for beginners and intermediate collectors who want professional-looking coin photos without a professional budget. It focuses on practical setups that use a smartphone or basic digital camera, plus inexpensive lighting and supports. The goal is to help you spend your money on coins, not on gear.
Good coin photography matters because graders, potential buyers, and even AI tools that identify and grade coins all rely on the quality of your images. If the details, color, and luster are captured correctly, your photos will communicate the true condition of your coins and help you make better decisions as a collector.
Basics and Definitions
Before building a simple coin photo studio, it is useful to understand a few key concepts that affect how your images look. Coin photography is different from general product photography because metallic, reflective surfaces are unforgiving. Small mistakes in lighting or focus can completely hide luster or important details.
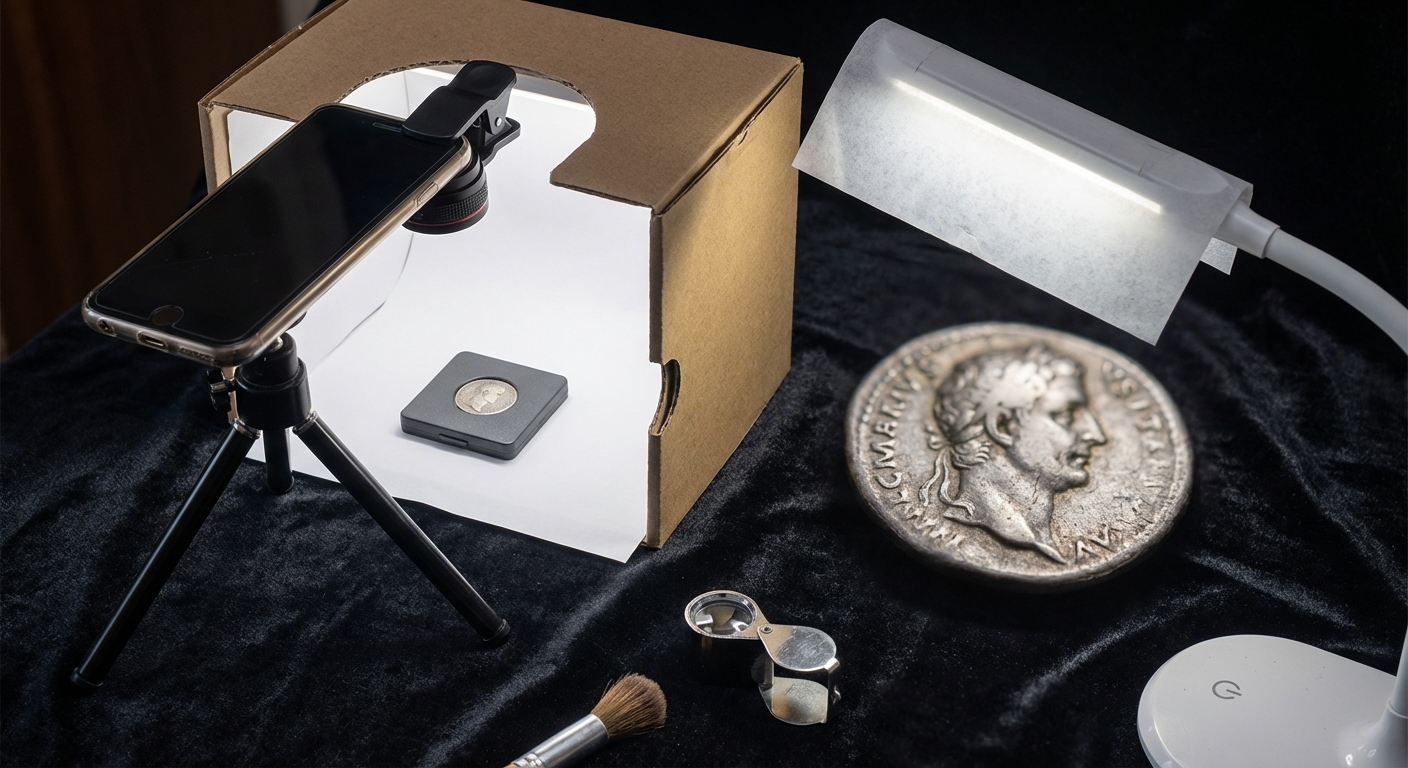
Coin photo studio in this context means a small, controlled space where you can place a coin, light it in a consistent way, and hold the camera steady above it. This can be a section of a desk with simple lighting and a stand, not necessarily a full light tent or commercial copy stand. Many collectors successfully photograph coins with just a smartphone, tripod, and LED lamps when the setup is thoughtfully arranged. (artemis-collection.com)
Macro photography refers to close-up images that show fine details of the coin. You may use a dedicated macro lens, a clip-on macro attachment for a smartphone, or simply the native close-focus capabilities of a modern phone camera. Macro work requires very stable support and careful focusing to keep the entire coin sharp. (coingraderai.com)
Diffused lighting is light that passes through a translucent material so it becomes soft and even. For coins, diffused LED desk lamps or a DIY light tent made from white paper or fabric help avoid harsh reflections and bright spots on prooflike surfaces. Many professional and advanced hobbyist setups use two diffused lights placed at angles around the coin to reveal details while controlling glare. (coingraderai.com)
Color temperature describes the color of the light. Daylight-balanced light in the 5000–6500 K range is ideal because it shows the coin’s color and toning more accurately than warm incandescent bulbs, which can make everything look yellow, or some fluorescents that may cast green or blue tints. (coingraderai.com)
Finally, stability simply means holding both the coin and camera as still as possible. Even with a budget setup, a small tripod or improvised stand will dramatically improve sharpness compared to hand‑held shots. (frankfortaffairs.com)
Detailed Explanation
The core idea of a simple coin photo studio is repeatability. If you can place any coin in the same spot, light it from the same angles, and frame it consistently, your photos will look uniform and be easy to compare. This is particularly helpful when studying grades according to the Sheldon scale or preparing coins for submission to grading services. (en.wikipedia.org)
Most low-cost setups are based on three elements: a stable camera position, controlled lighting, and a neutral background. A smartphone or entry‑level camera provides sufficient resolution for online sales and grading reference, as long as you keep it steady and use adequate light. Modern phones with a clip‑on macro lens and a low‑cost tripod or lab jack can rival much more expensive systems for typical collector needs. (artemis-collection.com)
Lighting is the most critical factor. Coins are small mirrors; direct or on‑camera flash produces bright hotspots that obscure design details and luster. The standard solution is to use two continuous light sources, like LED desk lamps or a ring light, placed at roughly 45 degrees to the coin from opposite sides. This arrangement illuminates the surface evenly, reduces glare, and reveals relief and texture. Many numismatic photographers also diffuse their lights with tracing paper, white plastic, or a light tent to further soften reflections. (coingraderai.com)
Another important principle is keeping the camera perpendicular to the coin. If your lens is tilted, the coin appears oval and detail can be distorted. A simple overhead mount or copy‑stand style arrangement fixes the angle and lets you swap coins in and out without constantly realigning the camera. Auction houses and professional studios generally keep the camera fixed while rotating or changing the coin underneath. (coingraderai.com)
Backgrounds should be non‑reflective and unobtrusive. Black velvet or felt is popular because it absorbs light and makes the coin appear to float, which is especially attractive for silver or gold pieces. Neutral gray or white matte card is also common in professional catalogs because it keeps exposure predictable and does not color‑cast the coin. The key is matte texture and solid color; glossy or patterned surfaces can add unwanted reflections or distract from the subject. (hipshotphotography.com)
From a numismatic perspective, a good photo is one that honestly shows grade, surfaces, and color. Overly dramatic lighting can hide hairlines or exaggerate luster, while heavy digital editing can mislead potential buyers or graders. Best practice is to use post‑processing only to correct exposure, white balance, and minor dust or background issues, not to alter the appearance of the coin itself. (coingraderai.com)
Practical Step-by-Step Guide
The following step‑by‑step process describes how to build and use a simple, inexpensive coin photo studio with equipment that most collectors can afford. You can adapt each step to your available space and budget.
Step 1: Choose Your Camera or Smartphone
Most modern smartphones are fully capable of excellent coin images. If you already own a phone with a relatively recent camera, start there before investing in a dedicated camera body. If you use a standalone camera, look for one with manual controls and a lens that can focus closely, or consider an entry‑level macro lens later. (coingraderai.com)
On a tight budget, consider adding a clip‑on macro lens to your smartphone. These inexpensive accessories help the phone focus closer and capture more detail. Ensure the lens can attach securely and is centered over the phone’s main camera.
Step 2: Create a Stable Overhead Mount
Stability is more important than the brand of camera. An ideal arrangement is similar to a copy stand: the camera points straight down, and the coin rests on a surface below. You can approximate this with a small tripod, a lab scissor jack plus a phone clamp, or even a stack of books with a phone resting on top, as long as it is safely supported. (artemis-collection.com)
Ensure the lens is as close to perpendicular to the coin as possible. Use a built‑in grid or level on your phone or camera, if available, to confirm alignment. Once your setup is fixed, mark the coin position on the background so every coin sits in the same spot.
Step 3: Set Up Budget Lighting
For a simple studio, two adjustable LED desk lamps with daylight bulbs are often enough. Position them at approximately 10 and 2 o’clock relative to the coin, angled down at around 45 degrees. This classic arrangement tends to minimize severe glare while providing even illumination across the surface. (coingraderai.com)
If your lamps are harsh or create bright hotspots on proofs or uncirculated coins, add diffusion. Tape thin white paper, tracing paper, or a piece of translucent plastic in front of the lamps, leaving enough space to avoid overheating. Alternatively, you can place the coin inside a homemade light tent made from a cardboard box lined with white paper and cut‑out windows for the lamps.
Step 4: Prepare the Background and Work Surface
Place a small sheet of black velvet, felt, or matte card on a stable table or board. Many budget‑minded collectors glue black felt to a foam board to create a portable backdrop that can be moved as needed. Keep a soft brush or canned air nearby to remove lint, which is very visible on dark backgrounds. (artemis-collection.com)
If you prefer a more neutral look, use gray or white matte paper. Avoid glossy paper, metal trays, tablets, or plastic with strong reflections. The background should not compete with the coin for attention.
Step 5: Handle and Position the Coin
Always handle coins by the edges and, if possible, wear cotton or nitrile gloves to avoid adding fingerprints. Place the coin flat on the background, centered under the camera, with the obverse facing up. If the coin is in a certified slab, do not break it out; instead, clean the outside of the holder with a microfiber cloth and adjust your light angles to minimize reflections. (hipshotphotography.com)
For raw coins in soft flips or capsules, it is usually better to remove them briefly for photography to reduce glare from plastic. Take extreme care when opening flips to avoid scratching the surfaces.
Step 6: Adjust Camera Settings and Focus
On a smartphone, tap the center of the coin to focus and lock exposure if your app allows it. Avoid digital zoom; instead, move the camera closer or farther away until the coin fills most of the frame while staying sharp. On a dedicated camera, use aperture values around f/8 to f/11 for adequate depth of field, and use either manual or carefully chosen autofocus on the highest relief of the coin. (coingraderai.com)
Use a timer or remote shutter to avoid shaking the camera when you take the picture. Even a two‑second delay can significantly improve sharpness, especially at macro distances.
Step 7: Photograph Both Sides and Edges
Turn the coin over carefully and repeat the process for the reverse. Try to maintain identical lighting and framing so that obverse and reverse are directly comparable. For coins with important edge lettering or errors, use a stand or soft support (such as a small piece of kneaded putty) to hold the coin vertically and light it from the side to emphasize the edge detail. (coingraderai.com)
Take several images of each side. Slightly changing the angle of the lights or rotating the coin a few degrees can help capture different aspects of luster or toning.
Step 8: Basic Post-Processing
After capturing your images, use basic photo editing tools on your phone or computer to crop the photo, straighten the coin, and adjust exposure, contrast, and white balance to match the coin as you see it in hand. Avoid heavy sharpening or saturation that makes the coin look more dramatic than it really is. The objective is faithful representation for coin collecting, grading, or selling, not artistic manipulation. (coingraderai.com)
If the images are for sales listings or grading submissions, keep a consistent style across all coins. That consistency makes your numismatic collection look organized and professional.
Common Mistakes and How to Avoid Them
Even with a carefully built budget studio, collectors often fall into predictable traps. Recognizing these mistakes will save time and help you achieve better results faster.
Using on-camera flash. Built‑in flash units create stark reflections and washed‑out highlights on coins. To avoid this, disable flash entirely and rely on continuous lamps or natural daylight. If you need more brightness, add another LED lamp or move lights closer instead of using flash. (coingraderai.com)
Unstable shooting position. Hand‑held photos are almost always softer, especially at close distances. Even a low-cost tabletop tripod, phone clamp, or improvised stand will dramatically improve sharpness. Set a short timer to prevent blur from pressing the shutter. (frankfortaffairs.com)
Harsh or uneven lighting. Pointing a bright desk lamp straight at the coin often produces bright hot spots and deep shadows. Instead, angle lights from the sides and use diffusion materials. Rotate the coin until the glare disappears and the field and devices are evenly illuminated. (coingraderai.com)
Inaccurate color and white balance. Warm household bulbs can make silver coins look gold and distort attractive toning. Whenever possible, use daylight LED bulbs and adjust white balance so the background looks neutral. Check that copper and gold coins look natural, not oversaturated or strangely tinted. (coingraderai.com)
Busy or reflective backgrounds. Shiny trays, colored fabrics, and cluttered surfaces compete with the coin and create reflections. Keep backgrounds plain, matte, and non‑reflective. A simple piece of black felt or gray card is inexpensive and effective. (hipshotphotography.com)
Over-editing images. It is tempting to remove every mark or enhance colors aggressively, but doing so distorts the true condition and can mislead buyers or grading services. Limit edits to basic global adjustments and dust removal from the background. Do not remove contact marks or hairlines from the coin itself. (coingraderai.com)
Connection to Online Tools
Your simple coin photo studio becomes even more powerful when combined with modern online tools. Many platforms now rely heavily on images for automated analysis, such as AI-based grading, variety identification, and counterfeit detection. Services that specialize in coin photography for grading or AI evaluation often provide specific guidelines about resolution, lighting, and framing; following those recommendations when you shoot will improve the accuracy of the results. (coingraderai.com)
Inventory and collection management software, as well as online auction platforms, also benefit from high‑quality, consistent images. Good photographs make it easier to track individual pieces in your numismatic collection, compare coins over time, and present them attractively when you decide to sell or trade. Some sites and mobile apps let you upload both obverse and reverse photos to generate digital coin cards, catalog entries, or comparison views that help you study wear patterns and grades. This article is for informational purposes only and does not constitute investment advice.
Summary
A simple coin photo studio does not need to be expensive. By focusing on a stable overhead mount, diffused daylight‑balanced lighting, and a clean, matte background, you can capture sharp, honest images of your coins using equipment you already own or can acquire cheaply. Smartphone cameras combined with basic supports and inexpensive LEDs are sufficient for most collectors’ needs. (artemis-collection.com)
Consistent, well‑lit photos are essential for grading decisions, online sales, AI‑based tools, and long‑term documentation of your numismatic collection. By avoiding common mistakes such as harsh flash, poor stability, and over‑editing, you protect your reputation as a seller and maintain transparency about your coins’ true condition. Over time, refining your studio and workflow will become as natural a part of the hobby as choosing albums or holders.
Start with a simple, repeatable setup and upgrade only when your skills and needs demand it. The coins themselves should remain the focus of your budget and attention; your coin photo studio is there to serve the collection, not overshadow it.
Frequently Asked Questions (FAQ)
What is the cheapest way to photograph my coins at home?
The cheapest effective method is to use a modern smartphone, two daylight LED desk lamps, and a simple matte background such as black felt on a table. Stabilize the phone with a small tripod, stack of books, or a lab jack and phone clamp so it points straight down at the coin. This combination offers sharp, well‑lit images for minimal cost. (artemis-collection.com)
How should I light coins to avoid glare in photos?
Place two diffused light sources at roughly 10 and 2 o’clock, angled about 45 degrees toward the coin. Use daylight‑balanced LEDs and soften them with white paper, a light tent, or frosted covers. Adjust the angles and rotate the coin until bright hotspots disappear and details across the field and devices are clearly visible. (coingraderai.com)
Do I need a macro lens for coin photography?
A dedicated macro lens provides maximum sharpness and flexibility, but it is not required for a simple coin photo studio. Many smartphones focus closely enough for general documentation, and inexpensive clip‑on macro lenses can improve detail. For serious grading and publication work, a macro lens on a camera body is a worthwhile later upgrade. (coingraderai.com)
Should I remove coins from slabs or holders for better photos?
Do not remove coins from certified slabs, as that voids their certification and can reduce value. Instead, clean the outside of the holder gently and adjust your lighting to reduce reflections. For raw coins in soft flips or capsules, you can briefly remove them to avoid plastic glare, taking great care not to scratch the surfaces. (hipshotphotography.com)
How do I edit coin photos without misrepresenting the coin?
Limit editing to cropping, straightening, and global adjustments of exposure, contrast, and white balance so the photo matches the coin in hand. Minor dust removal from the background is acceptable, but do not remove marks, hairlines, or other surface defects from the coin itself. Ethical editing focuses on clarity and accuracy, not on making the coin look better than it is. (coingraderai.com)