In the world of numismatics, a picture is worth more than a thousand words—it can be the difference between a successful sale and a missed opportunity, or an accurate appraisal versus a speculative guess. Whether you are building a digital inventory of your treasured collection, preparing a piece for auction, or simply sharing your passion on a hobby blog, high-quality, professional coin photos are absolutely essential. (wikihow.com) For the collector, clear images allow for detailed visual documentation, capturing a coin’s true characteristics, from its subtle toning to its minting imperfections. (coincollecting.com) For dealers, sharp, well-lit photographs are the primary sales tool, directly influencing buyer confidence and the coin’s perceived value. This comprehensive, step-by-step guide is designed to help you transform blurry smartphone snaps into stunning numismatic images, all from the comfort of your home setup.
Taking professional coin photos is an acquired skill, but it is one that anyone can master with the right equipment and understanding of a few fundamental photographic principles. The key is to reveal every minute detail—the stories etched into each piece—without introducing distorting glare or harsh shadows.
Fundamental Concepts of Coin Photography
Achieving truly professional results requires an understanding of a few technical concepts specific to photographing small, reflective metal objects. These principles dictate the equipment choices and setup adjustments you will make.
Macro Photography: The Closer View
The defining technique in numismatic imagery is macro photography, which allows you to capture the coin’s features in extreme detail by positioning the camera lens very close to the subject. This close proximity, however, has a critical side effect: even the slightest camera movement is greatly magnified in the resulting photograph. This sensitivity makes stability tools mandatory, as shaking hands will inevitably lead to an unusable, blurry image. (legacy-coins.com)
Controlling Light and Reflections
Coins are highly reflective, which can lead to distracting hotspots or a loss of detail (known as ‘blown-out highlights’) if the lighting is too harsh or direct. The solution is to use diffused light. Diffusers or softboxes spread the light evenly across the coin’s surface, minimizing reflections and shadows. (coinpeople.com) Furthermore, the angle of the light is crucial for revealing the coin’s three-dimensional nature, texture, and luster. Unlike many other photography subjects, too-even, flat lighting can make a coin look lifeless. (ngccoin.com)
The Importance of White Balance and Focus
White balance (WB) is the setting that ensures your camera accurately represents the coin’s true colors by compensating for the color temperature of your light source. Without proper WB, images may have an undesirable color cast, such as a yellowish or bluish tint. (tabletopstudio.com) In terms of focus, you must use a small aperture—represented by a high f-stop number (e.g., f/11, f/16, or higher)—to maximize the depth of field. This ensures that the entire coin, from the edge to the center and including any surface texture, is sharp and in focus. (coinimaging.com)
Essential Equipment and Setup Development
The right tools don’t have to be prohibitively expensive, but investing in a few key items will dramatically improve the consistency and quality of your coin photos.
Camera and Macro Lens
While modern smartphones with macro attachments can produce surprisingly good results for a beginner, a Digital Single-Lens Reflex (DSLR) or Mirrorless camera with a dedicated macro lens is recommended for professional-grade images. (blogspot.com) A lens that achieves 1:1 magnification (life-size on the sensor) is generally considered the gold standard for coin photography, with focal lengths around 100mm being popular choices. If using a smartphone, you must rely on a dedicated external macro lens attachment and a manual camera app to control settings like focus and white balance.
Tripod or Copy Stand
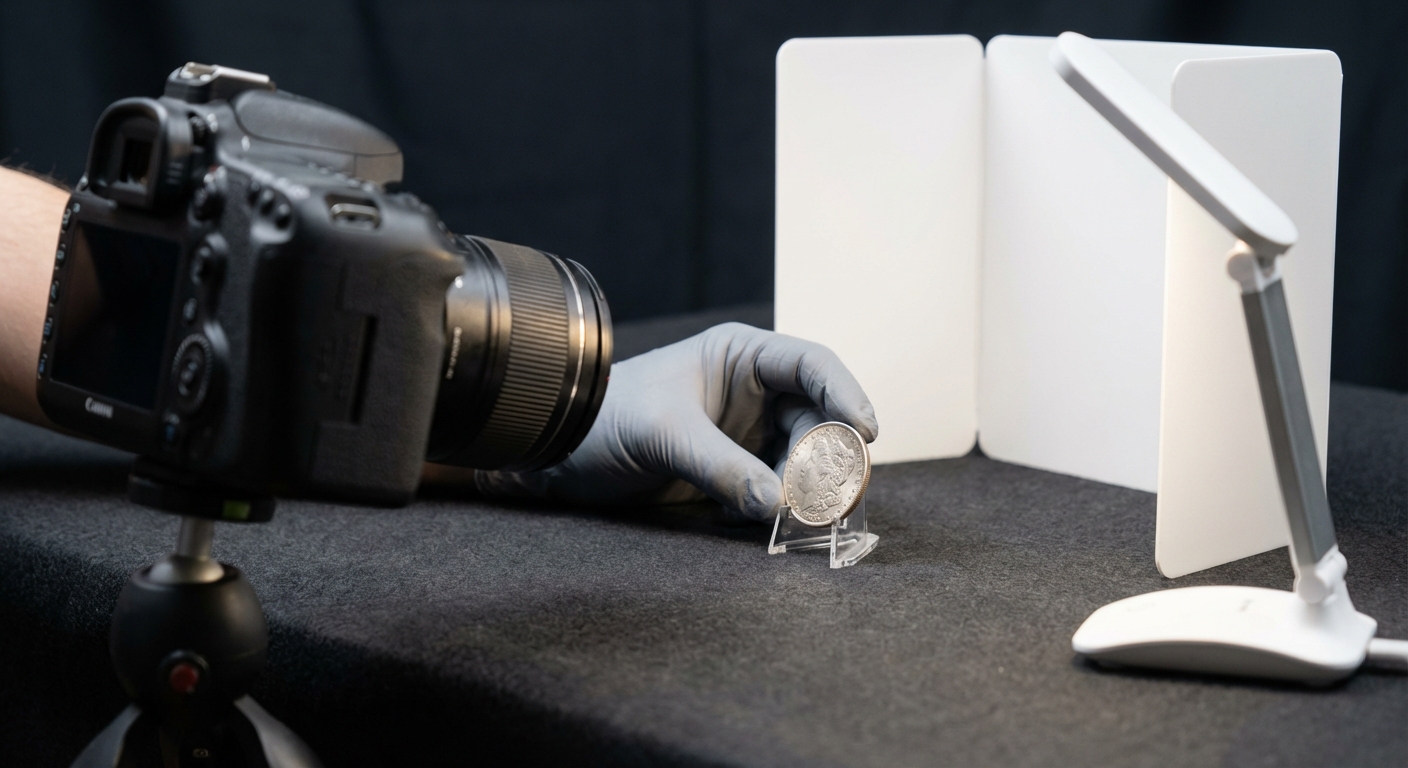
Stability is non-negotiable. A sturdy tripod or a dedicated copy stand will lock your camera in place, eliminating camera shake and allowing for precise, repeatable positioning. For overhead shots, a copy stand is often more practical than a standard tripod. Use a remote shutter release or the camera’s self-timer to trigger the shot without physically touching the camera, which prevents minor vibrations.
Lighting and Diffusion Tools
The best lighting setup involves two constant, cool-toned light sources—such as LED panel lights or compact fluorescent bulbs (around 5000K, close to natural daylight). (coinimaging.com) These sources must be diffused using a softbox, tracing paper, or a custom light tent to soften the light. Reflectors, such as a piece of white foam board, can be used opposite the main light to bounce fill light back onto the coin, minimizing strong shadows.
Practical Step-by-Step Coin Photography Instruction
Follow this methodical process to achieve consistent, high-detail images of your numismatic items.
- Preparation and Setup: Always handle your coins by the edges, preferably while wearing cotton or nitrile gloves, to avoid transferring skin oils. Place the coin on a simple, uncluttered background—many numismatists prefer a flat, illuminated panel or a neutral, dark surface. Secure your camera to your tripod, pointing straight down at the coin (a square-on shot) or at a very slight angle, depending on the coin’s condition.
- Initial Camera Settings: Switch your camera to Manual (M) mode for full control. Set the highest aperture possible (e.g., f/16 or f/22) to maximize depth of field, which will force your shutter speed to be slower, necessitating the tripod. Set a low ISO (e.g., ISO 100 or 200) to minimize digital noise.
- Focus and Precision: Engage the camera’s macro or close-up mode. For critical sharpness, use manual focus and magnify the live view on your camera screen to ensure the coin’s surface texture is perfectly sharp. If using autofocus, switch to spot focus mode to ensure the camera is locking onto the coin, not the background.
- Lighting Angle and White Balance: Position your two diffused light sources at the “10 and 2 o’clock” positions relative to the coin. This two-point side lighting is a classic numismatic technique designed to bring out the coin’s relief and luster by creating subtle highlights and shadows. (ngccoin.com) Adjust your camera’s white balance to match your light source (e.g., Fluorescent or a Custom WB reading) to ensure accurate color representation.
- Exposure and Capture: Adjust the power of your lights or the shutter speed until the exposure is correct. In macro photography, a slight overexposure (around +0.7 to +1.0) is sometimes used to prevent darker areas on the coin. Use the camera’s timer or a remote to take the picture, guaranteeing zero camera movement. Take multiple shots of the obverse and reverse, and consider different angles or lighting adjustments (such as a single side-light) to reveal different features for appraisal purposes. (pricethatcoin.com)
Common Mistakes and How to Avoid Them
Even with the right equipment, subtle errors in technique can degrade a photo’s quality, making a high-grade coin appear ordinary. Avoiding these pitfalls is key to professional results.
- Blurry Photos Due to Camera Shake: This is the most frequent error in macro work. The proximity of the lens to the coin magnifies any movement. To prevent this, always use a solid tripod or copy stand, and trigger the shutter using a 2-second timer or remote control.
- Glare and Blown-Out Highlights: Direct light sources or on-camera flash will create harsh, white reflections that erase surface details, especially on proof or highly-lustrous coins. To solve this, always diffuse your light sources (using softboxes or a light tent) and never use the camera’s built-in flash.
- Flat and Lifeless Contrast: Uniform, low-angle lighting can make the coin look two-dimensional, failing to showcase its relief. Increase the angle of your lights so they are closer to the coin’s vertical axis (closer to 90 degrees) to increase contrast, bring out luster, and highlight the devices (raised elements).
- Coin Image is Too Small: Submitting a photo where the coin takes up only a fraction of the frame makes accurate appraisal impossible due to insufficient detail. Move the camera closer to the coin until it fills the frame completely, and then crop the image tightly during post-processing.
- Incorrect Color/Toning: Failure to set the white balance correctly can distort the coin’s true color, which is critical for accurately assessing toning and patina. Always set a custom white balance or use a daylight-balanced bulb (around 5000K) and adjust the camera’s WB setting to match.
Integrating Your Collection with Online Tools
Once you have captured professional-grade images, various online numismatic tools can help you manage, appraise, and share your collection. Apps exist for generating a full inventory, cataloging coins, or even identifying specific mint errors based on visual evidence. (youtube.com) Using high-resolution, accurately-colored photos in these inventory tools ensures your digital collection is as true to life as the physical coins themselves.
For refining your images, post-processing software like Adobe Lightroom or even advanced stock photo editors on your smartphone are invaluable. These tools allow you to make minor, non-destructive adjustments to contrast, exposure, and color temperature to perfectly represent the coin’s in-hand appearance. However, be careful to only enhance, not alter; deceptive editing can severely undermine your credibility as a collector or dealer.
Summary and Recommendations
Professional coin photography is a blend of precision, light control, and post-processing care. The three takeaways for achieving gallery-worthy images at home are simple: achieve absolute stability, master diffused side lighting, and ensure critical focus across the entire coin’s surface. A high-quality image serves as permanent, indisputable documentation of your coin’s condition and appeal.
We strongly recommend collectors invest in a dedicated macro setup, even if it is a budget-friendly mirrorless camera and macro lens, over relying solely on a handheld phone. Practice is the only path to mastery; experiment with different light angles—from the standard 10 and 2 positions to a more extreme single sidelight—to see how they interact with different metals and finishes. Remember, the goal is always to reveal the coin’s true nature, not hide any flaws. This article is for informational purposes only and does not constitute investment advice.
Frequently Asked Questions (FAQ)
What is the most critical piece of equipment for taking coin photos?
The single most critical item is a combination of a sturdy tripod or copy stand and a remote shutter release. Eliminating camera shake is essential for sharp, high-magnification macro photography, where the slightest movement results in a blurry image.
Should I use natural light or artificial light for my coin photos?
Artificial, controlled studio light (such as LED panels) is generally superior to natural light. While natural light can be soft and beautiful, it is inconsistent and difficult to control. Artificial lighting allows for repeatable setup, constant color temperature (via white balance), and precise positioning of diffusers to eliminate glare.
How do I eliminate the harsh reflections and glare on my slabbed coins?
Eliminating glare on coin slabs (graded plastic holders) requires controlling the light angle and using diffusion. Positioning two diffused light sources at a high angle (closer to 90 degrees) and slightly off-center (the 10 and 2 o’clock positions) will minimize reflections while still illuminating the coin within the holder. Some photographers also use polarizing filters to further reduce glare.
Is a dedicated macro lens required, or can I use a close-up filter?
For professional-level detail, a dedicated macro lens that can achieve a 1:1 magnification ratio is strongly recommended, as it is engineered for close focusing and sharpness. While close-up filters (diopters) are a cheaper alternative, they often introduce optical distortions and are not ideal for accurately documenting high-value numismatic items.