Understanding how a coin is made from the first design sketch to the final strike is essential knowledge for any serious coin collector or numismatist. The minting process directly affects a coin’s appearance, durability, rarity and, ultimately, its desirability in a numismatic collection.
This article walks you through each stage of modern coin production, from artistic design and die creation, through planchet preparation, to striking and quality control. While examples often come from the United States Mint and other major state mints, the core principles apply broadly to modern coinage worldwide.
Whether you are a beginner who wants to understand basic terms like “planchet” and “die,” or an advanced collector analyzing strike quality and mint errors, knowing how a coin is made from design to strike will help you grade coins more accurately, spot problems, and appreciate mint craftsmanship.
Basics and Definitions
Before diving into the minting line, it is helpful to clarify key terms that appear repeatedly in mint literature and auction catalogues.
Design is the artistic concept of the coin: portraits, national symbols, legends, denomination and edge inscriptions. In modern mints, designs are typically created by staff sculptor‑engravers and outside artists, then refined digitally and in 3D models before approval. (govmint.com)
A die is a hardened steel tool that carries an incuse (recessed) image of the design. During striking, the obverse and reverse dies come together with enormous pressure to impress the raised design onto a blank piece of metal.
A hub is the master tool with the design in raised relief, used to create working dies. Hub and die manufacture is a critical precision stage; mistakes here can generate well‑known die varieties and mint errors. (en.wikipedia.org)
A blank is a flat, round metal disc punched from a strip or coil of metal. After certain preparatory steps, a blank becomes a planchet—a blank with an upset rim, ready to be struck into a coin. (usmint.gov)
Striking is the act of feeding a planchet into a coining press, where it is compressed between dies (and confined by a collar) under heavy pressure, which transforms it into a finished coin.
Finally, finish refers to the surface characteristics of the coin. Circulating coins are produced for everyday use, while proof and special uncirculated issues are made with more careful preparation and striking to appeal specifically to collectors. (usmint.gov)
Detailed Explanation
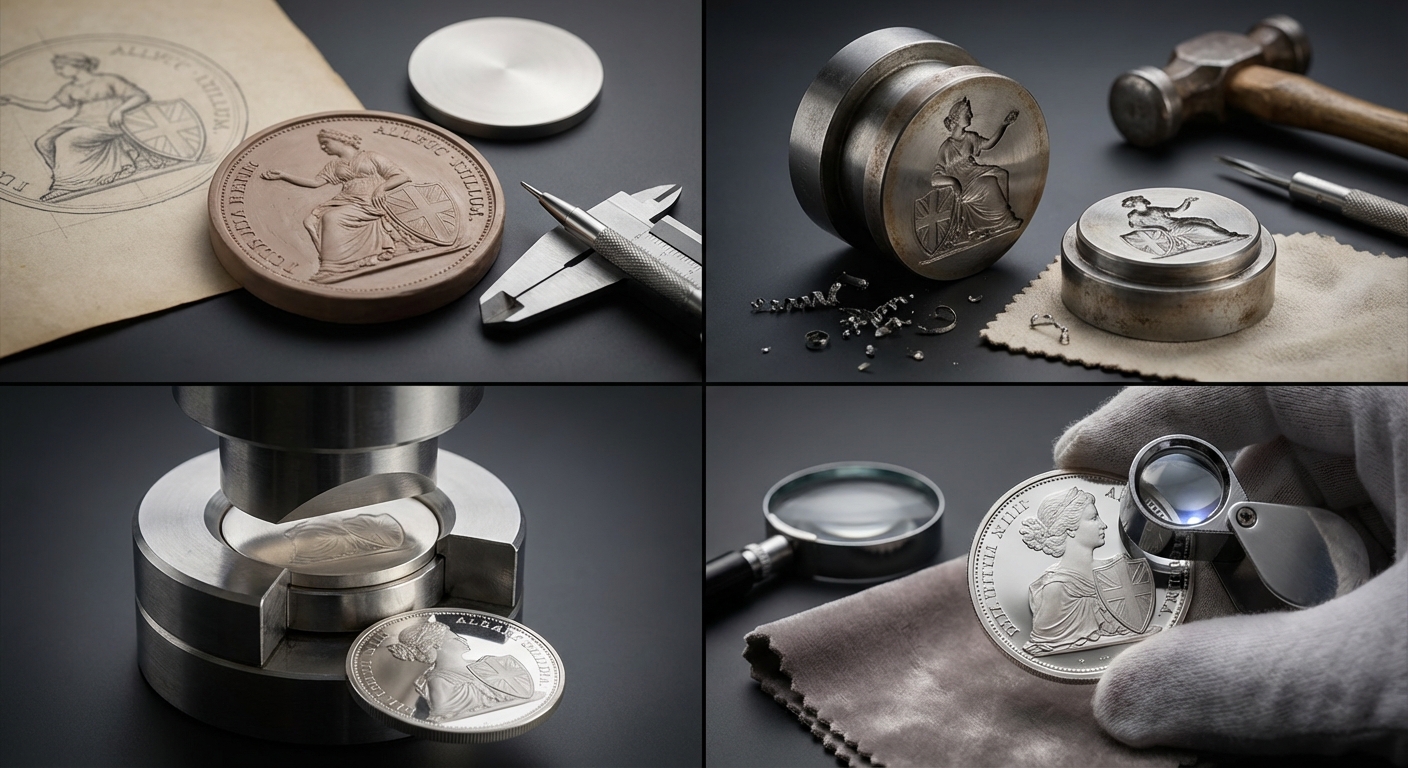
Modern coin production can be broken into several main stages: design and approval, die making, blanking and planchet preparation, and striking. Each influences what you see when you examine a coin under magnification.
From Artistic Concept to Approved Design
In many modern mints, coin programs start with legal or commemorative requirements set by law or by the issuing authority. Mint artists develop sketches and digital renderings, sometimes supported by external art programs and advisory committees that review competing designs. (govmint.com)
Designs are modeled in high relief, traditionally in plaster and increasingly via 3D digital modeling. This ensures that key elements—such as dates, mintmarks and security features—remain clear when scaled down to coin size and survive the stresses of circulation.
Die and Hub Creation
Once a design is approved, it must be transferred to steel tooling that will actually strike coins. A master hub is created first, carrying the design in raised relief. From this, a master die (incuse) is made, and then working hubs and working dies are generated to support mass production. (govmint.com)
Modern mints rely heavily on computer‑controlled milling machines and laser engraving to produce dies with very fine detail. After machining, dies are hardened and polished. Because dies wear under high striking pressures, multiple working dies of each side are produced for any major issue.
Blanking: Cutting Metal Discs
For many denominations, mints purchase long coils or sheets of metal made to precise alloy and thickness specifications. These coils are fed into a blanking press, which punches out thousands of blanks per minute—much like a high‑speed cookie cutter. Scrap webbing is recycled. (usmint.gov)
Blank edges after punching can be rough or have small burrs. Later processing and tumbling reduce these imperfections before the blanks move further along the line.
Riddling and Initial Quality Control
Blanked discs are sorted in a process often called riddling, where they pass over screens that remove thin, incomplete or off‑size blanks. Problem pieces are rejected and usually remelted, ensuring that only properly dimensioned blanks advance to annealing. (govmint.com)
Annealing, Washing and Drying
Cold working during rolling and blanking hardens the metal. To ensure clean, sharp strikes at lower die pressure, mints soften blanks in large furnaces—a process known as annealing. In modern facilities, blanks may be heated to around 1,400–1,600°F in controlled or oxygen‑reduced atmospheres, then quenched in water to lock in a softer crystal structure. (usmint.gov)
Annealing can discolor surfaces, so blanks are washed in chemical solutions and then dried, often with forced hot air. At this point they resemble smooth, featureless discs.
Upsetting: Creating the Rim and the Planchet
The next step is upsetting, in which blanks are run through a mill that squeezes the edge through a slightly narrower groove. The metal is forced upward to form a raised rim around the disc. The rim helps protect design elements from wear and assists stacking. (usmint.gov)
Once the rim is formed, the blank is technically called a planchet. Some mints purchase ready‑made planchets for certain denominations or special numismatic issues, but the principle remains the same: a smooth, dimensionally precise disc with an upset rim, ready for striking. (usmint.gov)
Special Treatment for Collector Coins
Proof and some uncirculated collector coins require additional planchet preparation. Selected planchets may be burnished—tumbled with small media and cleaning agents—to smooth and polish the surfaces, producing the highly reflective fields associated with proof coinage. These planchets are often hand‑inspected and handled with gloves or tools to avoid marks before striking. (usmint.gov)
Striking: From Planchet to Coin
Planchets are fed into high‑speed coining presses. In a typical vertical press, the lower die (anvil die) is fixed while the upper die (hammer die) moves, though configurations can vary. A collar surrounds the planchet during striking, controlling diameter and forming edge features such as reeding or lettering. (usmint.gov)
Circulating coin presses can apply from around 35 to 100 metric tons of pressure, depending on denomination and alloy, and can strike hundreds of coins per minute. Large bullion or multi‑ounce collector coins may require specialized presses exerting several hundred tons of force at lower speed. (usmint.gov)
When the dies close, metal flows into every recess of the design. As soon as the press retracts, the planchet has become a coin. Circulating and bullion coins are usually struck once, while proof coins are often struck at least twice using specially prepared dies and lower speeds to maximize detail and surface quality. (usmint.gov)
Quality Control and Mint Errors
Finished coins are typically examined through automated and manual quality checks. However, mistakes can still slip through. Known mint errors include off‑center strikes, wrong‑planchet errors, incomplete rims, or coins with missing design elements due to filled or misaligned dies. (en.wikipedia.org)
For collectors, these errors and varieties can be highly desirable, but authenticating them requires understanding how each stage of coin production could create a specific anomaly.
Practical Step-by-Step Guide
To help you connect theory to practice, here is the sequence of how a modern coin is made from design to strike, with notes on what collectors should watch for.
-
Design approval: An authority defines the theme and inscriptions; mint artists and committees refine and approve a final design. Collectors later track design changes, initials of engravers, and commemorative issues arising from this stage.
-
Modeling and digital preparation: The design is turned into a sculpted model or a detailed 3D file. Subtle differences here can produce varieties between issues, especially when minor adjustments are made between years.
-
Hub and die production: Master hubs, master dies and working dies are manufactured, hardened and polished. Errors such as doubled dies or missing elements originate here and can produce famous collectible varieties when they reach circulation. (en.wikipedia.org)
-
Metal coil production: Rolling mills produce coils or strips of alloy with tight tolerances for thickness and composition. For numismatists, changes in alloy composition (for example, wartime or inflation‑driven changes) create distinct types worth cataloguing.
-
Blanking: Blanking presses punch out discs. Dimensional accuracy at this stage affects weight and diameter. Under‑ or over‑weight blanks, when not rejected, can lead to error pieces that attract collector attention. (coinworld.com)
-
Riddling and scrap recovery: Defective blanks are removed; scrap metal is recycled. Understanding that mis‑shapen blanks are meant to be removed helps collectors evaluate whether an odd shape was mint‑made or post‑mint damage.
-
Annealing, washing and drying: Blanks are softened and cleaned. Inconsistent annealing can affect strike strength, and residues or stains may occasionally persist, which specialists sometimes study to distinguish mint‑origin toning from environmental damage. (usmint.gov)
-
Upsetting and planchet preparation: The rim is formed, turning blanks into planchets. Weak or missing rims on finished coins can indicate striking problems, collar issues or planchet defects at this step. (usmint.gov)
-
Special finishing (for proofs and numismatic issues): Selected planchets are burnished, inspected and sometimes manually handled to maintain pristine surfaces. Collectors of proof sets should be particularly attentive to hairlines or contact marks that may indicate handling after this careful stage. (usmint.gov)
-
Striking: Planchets enter coining presses and are transformed into coins. Parameters such as press pressure, die alignment, collar integrity and die wear all influence strike quality—key elements of professional coin grading.
-
Post‑strike handling and packaging: Circulating coins are counted and bagged in bulk, leading to bag marks and contact marks. Numismatic products are usually handled more gently and encapsulated or placed in special packaging, which collectors rely on to maintain condition.
Common Mistakes and How to Avoid Them
Understanding the minting process helps collectors avoid typical errors in attribution, grading and storage.
Confusing Post-Mint Damage with Mint Errors
One of the most common mistakes is assuming that any unusual mark or shape must be a rare mint error. Many damaged rims, flattened details or scratches occur after the coin leaves the mint. Knowing that collars control diameter and that presses strike with immense, even pressure allows you to distinguish true off‑center or wrong‑planchet errors from simple abuse. (en.wikipedia.org)
To avoid misattribution, compare suspect pieces with documented error types from grading services and numismatic references, and when in doubt, seek professional authentication.
Ignoring Strike Quality in Grading
Novice collectors often focus only on wear, ignoring how well the coin was struck originally. Weakly struck coins may show incomplete hair details or soft lettering even in high mint state grades, especially on harder alloys or late‑stage worn dies. (coinworld.com)
When grading, always ask: is the softness due to circulation wear, or is it a result of insufficient metal flow during the strike? Understanding the pressures and die conditions of the minting process helps answer this question accurately.
Overlooking Planchet Flaws
Some surface imperfections originate in the planchet itself: laminations, gas bubbles, or incomplete rims. Because these occur before striking, they are treated differently from contact marks or scratches. If you know how blanks are rolled, annealed and washed, you can better identify when a flaw is planchet‑related.
When buying higher‑value pieces, especially vintage issues where quality control was less strict, study the surface carefully under magnification and consult variety guides to determine whether such flaws add character or materially reduce value.
Assuming All Prooflike Surfaces Are Proofs
Modern mint technology and well‑polished dies sometimes produce circulating or bullion coins with highly reflective, prooflike fields. Without understanding that proofs involve specially prepared dies, planchets and multiple careful strikes, collectors may misclassify such coins.
Learn the official definitions used by major mints and grading services for proof, uncirculated and bullion finishes, and always consider how the coin was made—not just how shiny it looks. (usmint.gov)
Connection to Online Tools
The detailed knowledge of how a coin is made from design to strike becomes even more useful when paired with modern online tools. Digital collection managers and inventory systems allow you to record mint, denomination, alloy, strike type (circulation, proof, bullion), die varieties and error classifications in a structured way, reflecting the full production story of each piece.
Other platforms help generate custom coin cards or display labels that summarize technical data such as weight, diameter, edge type and designer initials, drawn from mint specifications and standard catalogues. By incorporating minting‑process details into these descriptions, you create educational displays that benefit both you and anyone viewing your collection.
Summary
From the first concept sketch to the final strike, every step in the minting process leaves a trace on the finished coin. Design choices, die preparation, planchet quality and press settings all influence appearance, durability and collector interest.
For coin collecting and numismatics, understanding how a coin is made from design to strike is not just academic. It directly improves your ability to grade accurately, identify genuine mint errors, appreciate special proof and uncirculated issues, and document your holdings. This article is for informational purposes only and does not constitute investment advice.
By combining this technical insight with careful observation, reference to mint documentation and thoughtful use of online tools, you can build a more sophisticated, well‑curated numismatic collection.
Frequently Asked Questions (FAQ)
What is the difference between a blank and a planchet?
A blank is a flat metal disc punched from a strip or coil, while a planchet is a blank that has passed through the upsetting mill to form a raised rim, making it ready for striking into a coin. (usmint.gov)
How much pressure is used to strike a coin?
Circulating coin presses typically use roughly 35 to 100 metric tons of pressure, depending on denomination and metal, while large bullion or special collector coins may require several hundred tons to bring out full design details. (usmint.gov)
Why are proof coins struck more than once?
Proof coins use specially prepared dies and planchets and are often struck at least twice at lower speeds so that metal flows fully into the design, creating sharp details, frosted devices and highly reflective fields prized by collectors. (usmint.gov)
What types of mint errors come from the striking process?
Striking‑related mint errors include off‑center strikes, brockages, strike‑throughs (where foreign objects come between planchet and die), weak strikes from low pressure or filled dies, and coins struck on the wrong planchet. (en.wikipedia.org)
How does knowing the minting process help with coin grading?
Knowing each step in coin production helps you distinguish weak strikes from wear, planchet flaws from post‑mint damage, and genuine mint errors from ordinary abuse, leading to more accurate grading and better purchasing decisions.